Guide for building your own ambient system:
- Step 1: Addressable led strip
- Step 2: Power supply
- Step 3: USB grabber
- Step 4: Additional stuff
- Step 5: Device for hosting HyperHDR...macOS, Windows or Raspberry Pi?
- Step 6: Installing HyperHDR software
- Step 7: How to set up HyperHDR? Part I: basic configuration
Navigate to the section:
- Windows 10
- Raspbian for Raspberry Pi (SD image installation)
- Raspbian for Raspberry Pi (package installation)
- macOS installation
Windows offers the best user friendly experience as always.
- Download build of HyperHDR for Windows from HyperHDR github project.
For example: HyperHDR-12.0.0.0-Windows-AMD64.exe - Uninstall previous version of Hyperion/HyperHDR (if applied).
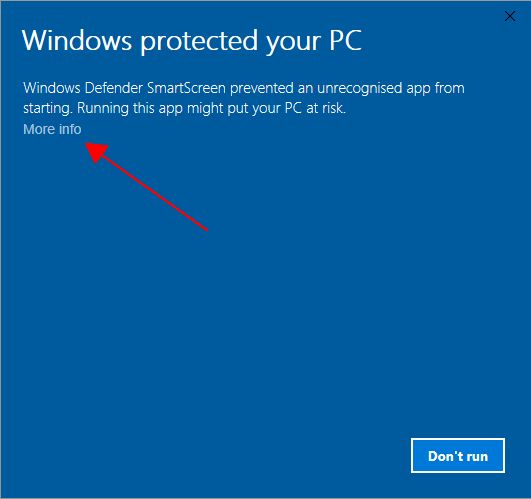
- Run the installer. Windows probably will ask are you sure? Yes, you are ;) It's default behavior for the first time usage for files downloaded from the internet without EV certificate which costs a lot.
- Then proceed with the installer... just click few times 'next' and 'finish'. Congratulation, you've got your HyperHDR system installed :)
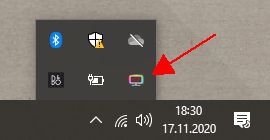
- Run the HyperHDR from the desktop shortcut.
- The HyperHDR icon will show up in the right-bottom corner
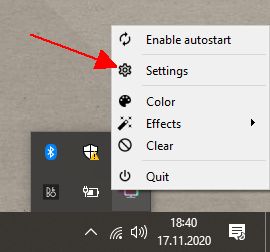
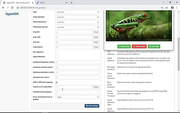
- Click it the right button. The menu will show up. Then select 'Settings'. The browser will open HyperHDR www panel.
- Proceed with the configuration from this video as an example:
Raspbian for Raspberry Pi (SD image installation)
- Download and extract the sd image from HyperHDR github release repository.
For Raspberry Pi Zero,1,2 choose: SD-card-image-rpi012-armv6.zip
For Raspberry Pi 3 and 4 choose: SD-card-image-rpi34-armv7.zip
- Download and install Win32 Disk Imager
- Insert prepared SD to the reader. Check the reader's letter assigned in Windows.
- Run Win32DiskImager
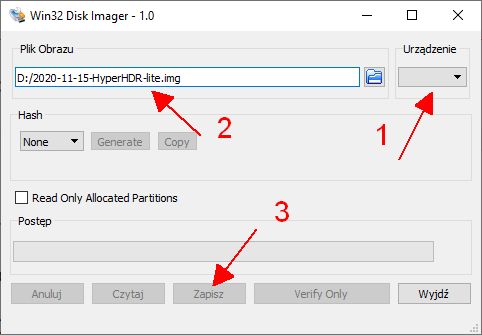
- Verify that the program selected correct SD card drive's letter
- Select the img file that you extracted from the downloaded archive.
- Click 'Save' to begin the process of writing
- Verify that the program selected correct SD card drive's letter
- After the image is written successfully probably you want to configure the Wifi connection for Raspberry Pi.
Create file namedwpa_supplicant.confin thebootfolder on the SD card and edit its content.
For example:ctrl_interface=DIR=/var/run/wpa_supplicant GROUP=netdev update_config=1 country=PL network={ ssid="Name of your wifi LAN" psk="Password for your wifi LAN" } - Take the SD out of the card reader and put it into the Raspberry Pi.
It is recommended to reboot the system after first boot because the user (pi) is just created then and the service may be unavailable during that session.
After boot default host name is: HyperHDR
Connect to the www panel using port 8090 (HTTP) or 8092 (HTTPS).
Default user is: pi
Default password is: raspberry
SSH and SPI are enabled on default.
Raspbian for Raspberry Pi (package installation)
Are you ready for a fight on your own with Bluetooth device or console for UART serial port that you want for usage with the led strip on some Raspberry Pi platform... and you remembered to enable SPI in the raspi-config just in case?
If so, please continue reading as you are advanced user ready for the Linux environment :)
- First please get rid off of the previous version of Hyperion NG or HyperHDR (if applied):
$sudo apt remove hyperhdr - Download the package from HyperHDR github release repo to the current directory.
Raspberry Pi Zero,1,2: choose v6l suffix.
For example: HyperHDR-12.0.0.0-Linux-armv6l.deb
Raspberry Pi 3 and 4: choose v7l suffix.
For example: HyperHDR-12.0.0.0-Linux-armv7l.deb - Install the package that you have downloaded from the current directory.
For example:$sudo apt install ./HyperHDR-12.0.0.0-Linux-armv7l.deb - HyperHDR should be up and running on the 8090 (HTTP) or 8092 (HTTPS) port.
- If the WWW panel is out of reach then run the following command to check what's happening:
$/usr/bin/hyperhdr -d - to start/stop HyperHDR service on Raspberry Pi:
$sudo systemctl start/stop [email protected]
macOS installation
Since version 16 HyperHDR offers direct support for USB grabbers for macOS (native x64 application, runs on Apple M1 in emulation also) and provides very friendly DMG installation container. Click following images to zoom them.
- Download and run DMG container. Setup process will start:

- After setup is finished you will have mounted volume with hyperhdr application. Click it to run it:

- It will take some time (up to one minute) for a first run. HyperHDR icon will be "jumping" in the lower-right corner. Wait until it finishes:

- After the application starts macOS will ask you about granting camera permission for hyperhdr application. It's required. If you missed the request you can always redo your choice in the macOS' system options. Similar dialog about granting microphone permission shows up when you use the sound effect for the first time (the application restart is required here).

- HyperHDR application is running now. Click HyperHDR icon ('H') in the upper-right corner to bring the menu and then click the settings item. It opens the browser with HyperHDR configuration panel.

- Now it's time to go through the typical HyperHDR configuration process. Below you have a screenshot with HyperHDR running video capturing and communicating with the LED strip using HyperSerialWLED connected to the USB port.
macOS Catalina:
macOS Big Sur is also supported:


Comments
sudo systemctl disable --now hyperiond@pi
sudo systemctl enable --now hyperiond@root
But I get the following error when running the second command:
Failed to enable unit: Unit file [email protected] does not exist.
wpa_supplicant.conf I can't see this either.
hyperion.ng deleted and is being reinstalled...It's totally different from the description.
Can you help me?
And again as per instruction if the service does not start then run /usr/bin/hyperiond -d to see what's going on.
When I am configuring HyperHDR I go to change my controller type to WS281x but once I do that, the "Remote Control" tab shows "LED Device" as "OFF" and clicking it changes it to ON but nothing happens and if I refresh page, it is back to OFF.
I have been running Hyperion with this exact setup for months and no issues.
Does it have to do with running these commands?
sudo systemctl disable --now hyperiond@pi
sudo systemctl enable --now hyperiond@root
When I run:
sudo systemctl disable --now hyperiond@pi
I get:
Removed /etc/systemd/system/multiuser.target.wants/[email protected].
When I run:
sudo systemctl enable --now hyperiond@root
I get:
Failed to enable unit: Unit file [email protected] does not exist.
What am I doing wrong?
I did install:
https://github.com/Howchoo/pi-power-button.git
So I had a power down button for my pi, I don't think that screwed anything up, did it?
When I run:
sudo systemctl enable --now hyperiond@root
I get an error:
Failed to enable unit: Unit file [email protected] does not exist.
- sudo systemctl disable --now hyperiond@pi as you did
- uninstall hyperhdr
- install hyperhdr from deb package this time
could ou please provide some kind of "how to upgrade" tutorial? I'm using v14 and would like to switch to v15. Since I have installed the v14 via the image and expanded the pi with some additional software, reinstalling the Pi with the image is no option for me. And to be honest, I have no idea how to update HyperHDR.
Thank you for your awesome work!
Sure, I understand. Created a guideline for that topic on github: https://github.com/awawa-dev/HyperHDR/discussions/43
Did you mean 'Forwarder' service? First configure it in the 'network service' to set target client and activate it there to see if everything is working OK (you need to switch to 'Expert level' in the upper right corner to see it, then check logs). I recommend to do it on the main (first) instance if you have multi-instance setup.
Im trying to get my Pi4b to run HyperHDR through Ethernet but i cant log in on putty and the HyperHDR webpage cant be found.
Ive added headless for now but any direction on this would be really appreciated.
Are you using HyperHDR SD ready images? Specifically for them, SSH is enabled on default so Putty must work with default Rapsbian credentials. HyperHDR service also should start on default and nothing has to be changed. First I would verify the network if you can ping your Raspberry. If you can't ping it then you have an answer: the problem is in network or you put wrong firmware (for wrong architecture) and Raspberry Pi doesn't boot at all. Or broken SD card.
Post a Comment